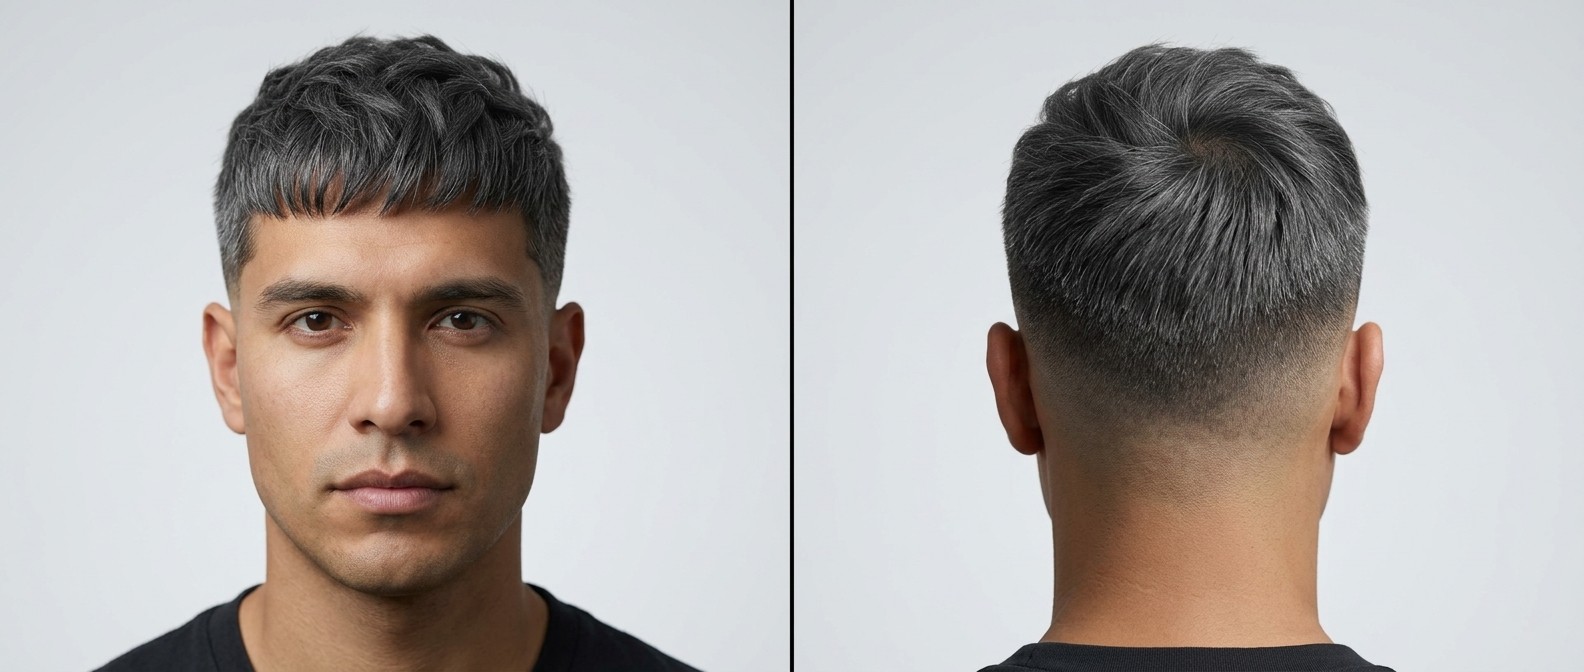
Textured Silver French Crop with High Skin Fade & Choppy Fringe
 Top
Short (2-5 cm)
Top
Short (2-5 cm)
 Sides
Very Short (1-6 mm)
Sides
Very Short (1-6 mm)
 Hair Type
Straight (Type 1)
Hair Type
Straight (Type 1)
 Face Shape
Rectangular
Face Shape
Rectangular
 Maintenance
Low
Maintenance
Low
 Thickness
Medium / Normal
Thickness
Medium / Normal
About This Style
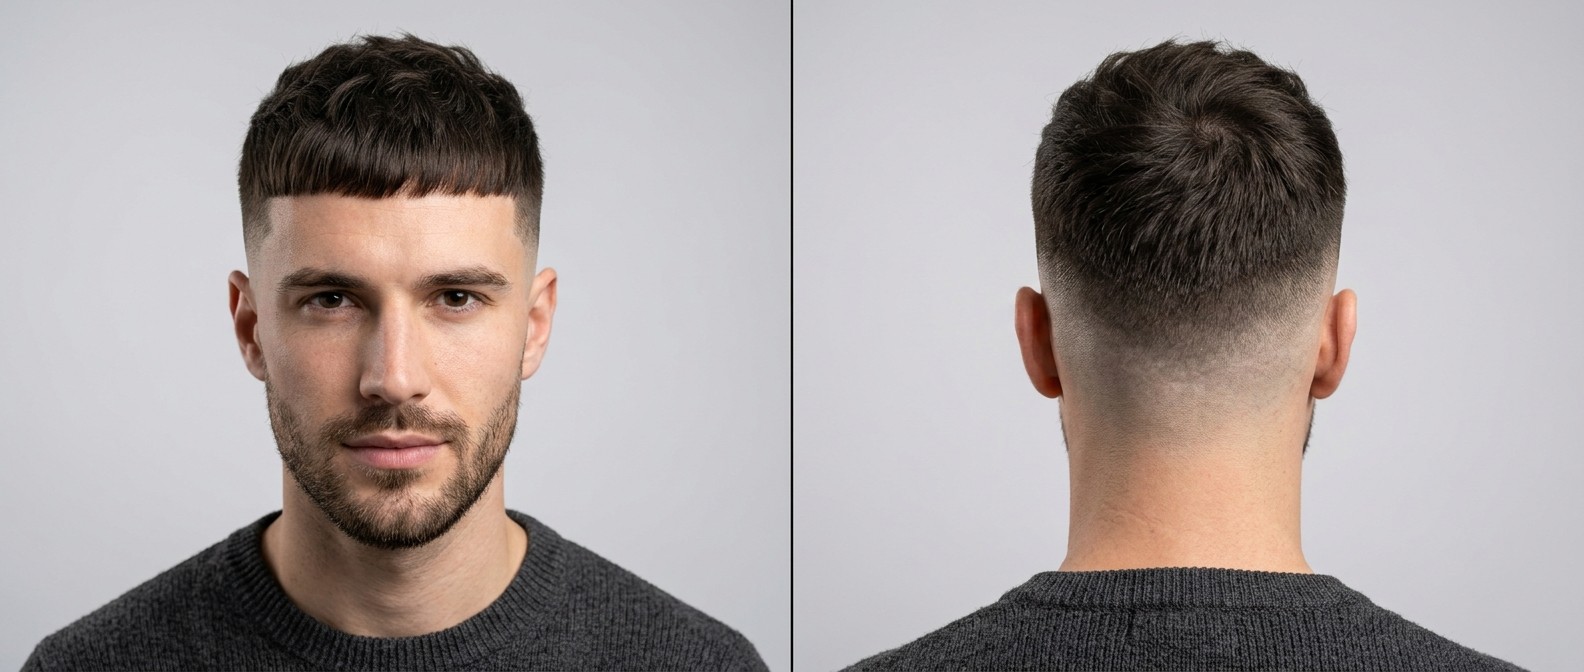
Embrace a bold, modern aesthetic with this heavily textured silver French crop. This specific variation masterfully combines a very short, high skin fade on the sides and back with a meticulously layered, short top measuring roughly two to five centimeters. The striking gray hair color adds an incredible dimension to the choppy texture, taking a classic barbershop silhouette and elevating it into a highly contemporary statement piece. It is a fantastic choice if you want a stylish yet low-maintenance look that requires minimal daily effort but still delivers maximum visual impact wherever you go.
Notice how the hair is directed entirely forward from the crown, resting in a slightly broken, blunt fringe just below the natural hairline. This deliberate forward-swept styling is incredibly effective at masking a receding hairline while simultaneously complementing the strong, angular jawline characteristic of a rectangular face shape. The tight skin fade visually slims the sides of the head, further accentuating the volume, movement, and sharp contrast created by the point-cutting on top.
Perfect for casual, everyday wear, this haircut thrives on a "less is more" philosophy. Because the architectural structure is built directly into the haircut through heavy texturizing by your barber, your morning routine is reduced to just a few minutes. It is an ideal match for straight, medium-thickness hair, offering a sharp, clean appearance that always looks effortlessly put together without ever needing heavy, greasy pomades or stiff gels.
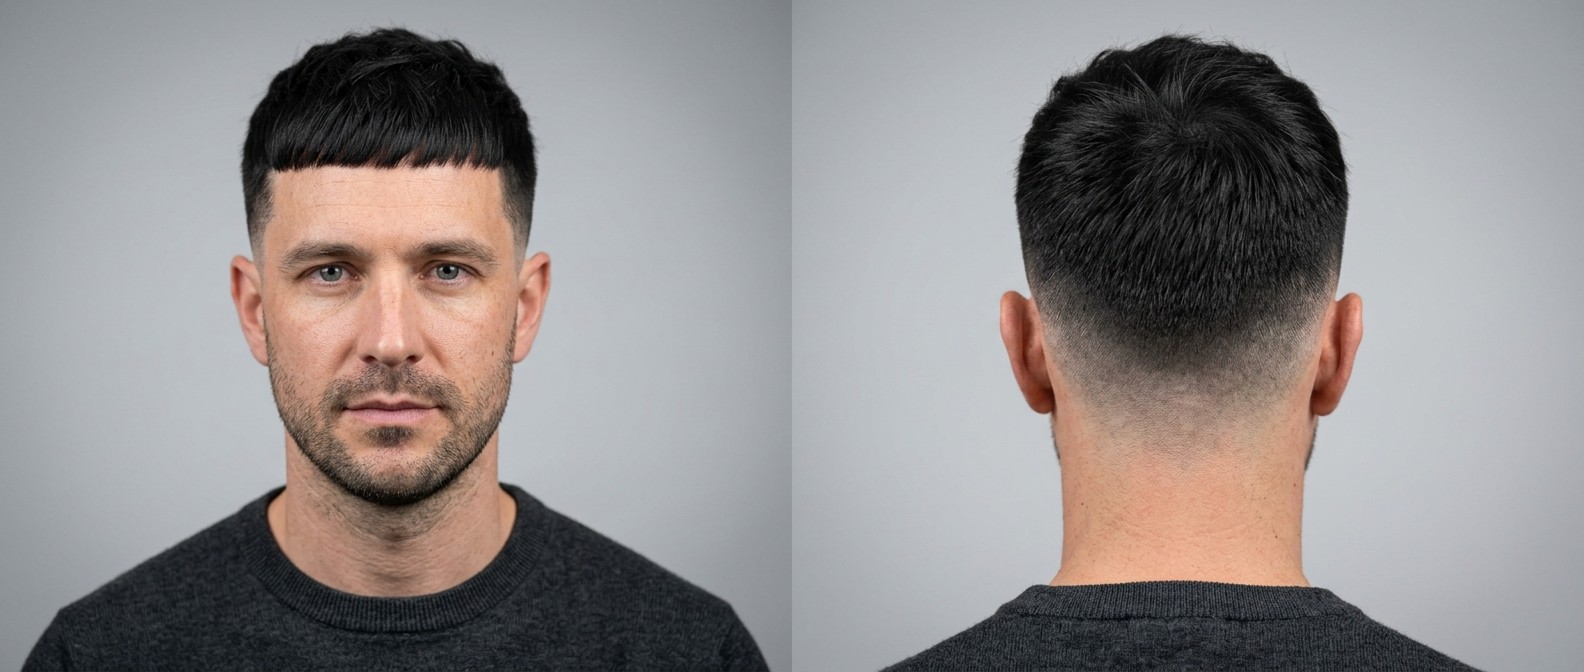
Key Features
- Striking silver and gray color profile that naturally enhances the visual depth, shadows, and highlights of the textured layers on top.
- High skin fade on the sides and back, dropping ever so slightly at the nape of the neck for a seamless, expertly blended transition.
- Forward-flowing hair direction originating from the natural swirl of the crown area, ensuring the hair lays flat and behaves predictably.
- Choppy, point-cut fringe that sits bluntly across the upper forehead to create a strong, defining horizontal line for the face.
- Heavily textured top measuring roughly 2 to 5 centimeters in length to intentionally encourage a messy, piecey, and modern aesthetic.
- Disconnected weight line where the highest point of the bald fade meets the textured crown, creating a sharp contrast in hair lengths.
- Clean, sharp line-up around the temple and C-cup areas to frame the face and provide a crisp boundary against the faded sides.
Getting the Cut
- Request a modern, highly textured French crop with a high bald fade on the sides and back to create a strong contrast.
- Ask the barber to take the sides down completely to the skin using a foil shaver, blending up to a #1.5 or #2 guard right below the parietal ridge.
- Specify that you want the hair on top left relatively short, approximately 2 to 5 centimeters in length, to keep maintenance low.
- Instruct them to leave the front fringe relatively blunt but slightly broken up with shears, sitting just below the front hairline to help mask any recession.
- Ask for heavy point-cutting and the use of texturizing shears across the entire top section to remove excess bulk and create a chunky, piecey appearance.
- Have them carefully follow your natural crown swirl when cutting, ensuring the hair lays flat and flows smoothly forward toward the forehead.
- Request a subtle, natural drop in the fade at the back of the head to maintain a flattering head shape and a cohesive silhouette from all angles.
Daily Routine
- Start your routine with towel-dried hair that is just slightly damp, ensuring it is completely clean and free of yesterday's product buildup.
- Apply a dime-sized amount of a matte styling powder or a few sprays of lightweight sea salt spray directly to the roots for foundational volume.
- Use a blow dryer set on medium heat and medium speed, directing the airflow strictly forward from your crown toward your front hairline.
- While blow-drying, use your free hand to rough up the hair, twisting small sections between your fingers to encourage the choppy, piecey texture seen in the photo.
- Once the hair is one hundred percent dry, take a small scoop of matte clay or texturizing styling paste, emulsifying it thoroughly between your palms until it virtually disappears.
- Lightly pat the product over the top of your head to distribute it evenly, then use your fingertips to piece out the front fringe and individually define the layered sections.
- Gently press down the sides and the crown area to ensure the overall silhouette remains tight and the forward flow is securely locked in place for the entire day.
Products & Tools
- Matte styling clay or premium texturizing paste (look for a medium to firm hold formulation with a completely zero shine finish).
- Volumizing hair texturizing powder to sprinkle directly at the roots for instant, weightless lift and enhanced strand separation.
- High-quality blow dryer equipped with a concentrator nozzle attachment for precise, forward-directed airflow during the styling process.
- Wide-tooth texture comb or styling brush to help guide the hair forward evenly without flattening the natural volume you just created.
- Sea salt spray (used as an optional pre-styler on damp hair) to add essential grit and grip to straight, medium-thickness hair types.
Maintenance
- Schedule standing barber visits every 3 to 4 weeks to maintain the absolute crispness of the high skin fade and keep the fringe length perfectly in check.
- Wash your hair 2 to 3 times a week using a gentle, sulfate-free daily shampoo to prevent your striking silver hair from becoming dry or brittle.
- Incorporate a high-quality purple or silver-enhancing conditioner into your routine once a week to keep the gray tones vibrant, cool, and free of brassiness.
- Strictly avoid using heavy, oil-based pomades or shiny wet-look gels, as they will aggressively weigh down the texture and ruin the dry, natural aesthetic of the crop.
- Sleep on a silk or satin pillowcase to significantly minimize overnight friction and prevent the short top hair from developing stubborn, hard-to-style cowlicks.
Best For
Face Shapes: Exceptionally ideal for rectangular, square, and oval faces; the prominent forward fringe visually shortens a longer face and balances strong features.
Hair Types: Works exceptionally well with straight (Type 1) hair of medium to normal thickness that naturally wants to lay flat against the scalp.
Hairline: An excellent, strategic choice for men with receding hairlines, as the layered forward sweep completely masks thinning areas at the front temples.
Lifestyle: Absolutely perfect for casual, everyday settings and highly active individuals seeking a low-maintenance, ready-to-go style that endures through the day.
Age Range: Highly flattering for men in their mid-twenties to late thirties, particularly those embracing their natural gray or silver hair transitions.
Pro Tips
- Do not let the front fringe grow past the middle of your forehead between cuts, or the entire style will quickly lose its sharp, structural impact and look unkempt.
- If your straight hair stubbornly struggles to hold texture, specifically ask your barber to use a razor cutting technique on top for maximum choppiness and separation.
- Always apply your texturizing styling powder directly to completely dry roots rather than wet hair to avoid clumping and ensure maximum, weightless volume.
- During colder, drier months, ensure you use a deeply hydrating leave-in conditioner, as gray hair naturally tends to dry out much faster and can look excessively frizzy.
- When applying matte clay, always start with a pea-sized amount; you can always add more product later, but applying too much initially will force you to wash it out and restart.
Related Hairstyles

French Crop
Wavy Textured French Crop with Seamless High Skin Fade
French Crop
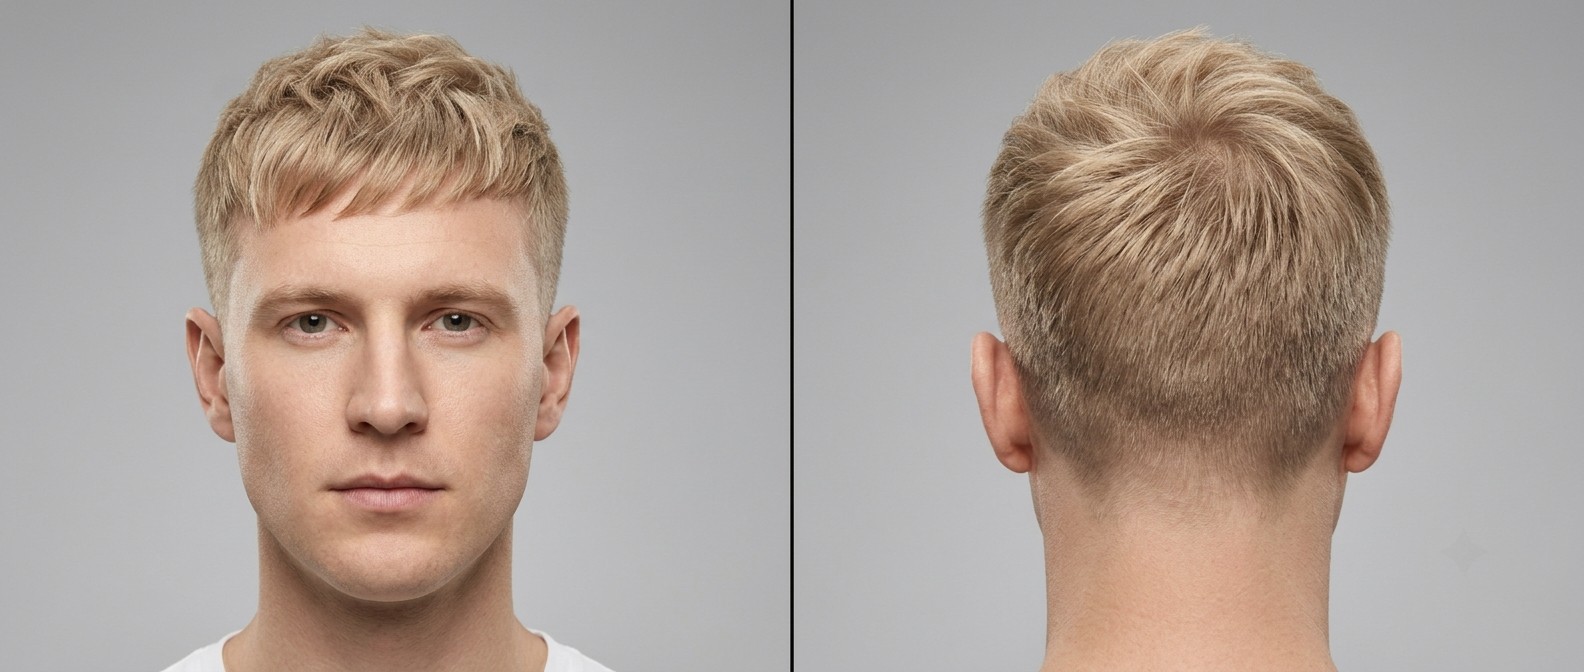
Textured Blonde French Crop with Forward Fringe and Tapered Sides
French Crop
Textured French Crop with High Skin Fade and Blunt Fringe
French Crop
Textured French Crop Haircut with a Sharp Blunt Fringe and Mid Skin Fade
French Crop
Textured French Crop with Choppy Forward Fringe and Clean Tapered Sides
French Crop